How to change the WordPress permalink structure
What are permalinks? Permalink is the URL that you see for your pages and posts. The permalink is built from your domain name and a slug. The slug is the part after the domain which can include as we mentioned the names of the post and pages, date, and others which you choose.
Permalinks are an important part of the SEO of your website and changing them after your website is built and has a good SEO might really damage the SEO. Permalinks help the search engines to view your website and they help you, visitors. Picking the right permalink for your website is up to and in this tutorial we will guide you in how to access the permalink page and change if necessary.
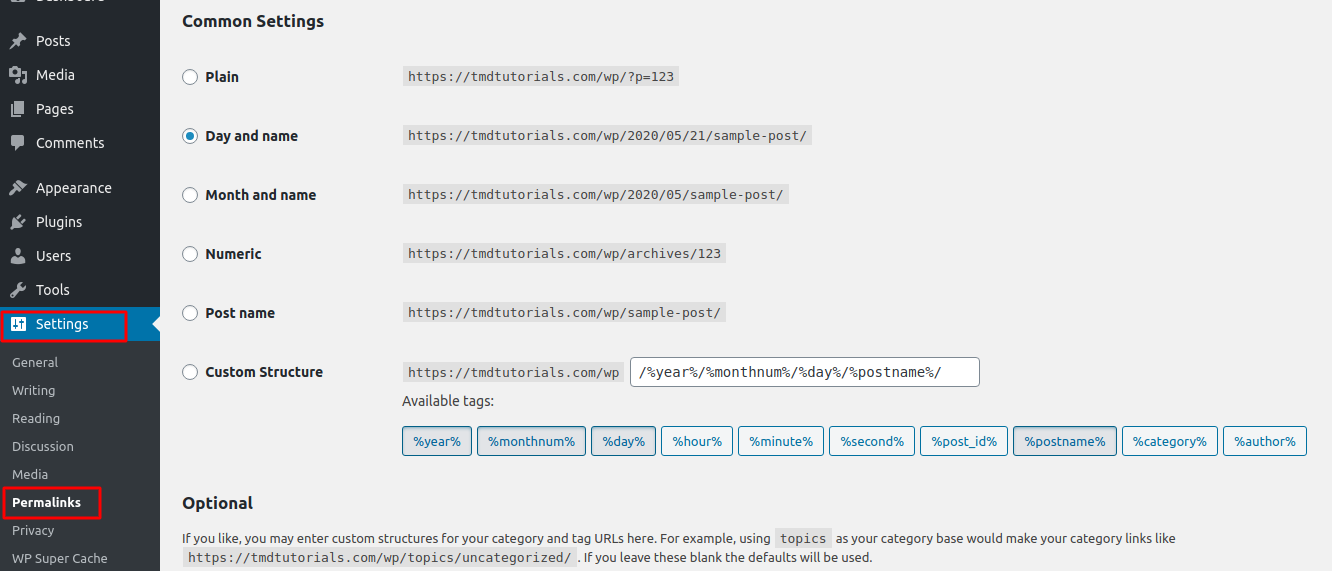
In order co change the permalinks for your website first thing is to access the admin area(yourdomain.com/wp-admin) → Settings → Permalinks

Types of permalinks
By default when a new WordPress website is installed the permalinks are set to a “Plain” type. However, this type is not user-friendly and it is not recommendable.
The option that is recomendable and is most used is the “Post Name”. Below we will describe every type of the permalinks so you can decide which is the best one for you:
- The Plain type is as we mentioned not the user-friendly one or also called the “Ugly” permalinks which contains characters and numbers at the slug https://yourdomain.com/?=584
- Day and Name: When you choose this type once you access an article for example on your website it will display in the URL bar the domain name and the slug with the day when the article was added and the name of the article https://yourdomain.com/2020/05/21/first-post
- Month and name: Just as the above one it will display the month the article was created and its name, however, without the exact date https://yourdomain.com/2020/05/first-post
- Numeric: this type ads at the slug the ID of the post https://yourdomain.com/archieves/145
- Post Name: this is the recommended type to use. It is user-friendly and it is also called the “Beautiful permalink” because it displayed the domain name and the name of the post htts://yourdomain.com/first-page
- Custom Structure: The last option are the custom permalinks. When you choose custom structure you can build the permalinks from the tags below
- %year% – this would show the year the post was added
- %monthnum% – displayed the month the post was added
- %day% – the day of the month the post was created
- %hour% – the exact hour of the day the post was created
- %minute% – the minute of the day the post was created
- %second% – the second the post was created
- %post_id% – the unique number of the post
- %postname% – the name of the post
- %category% – the category in which the post is added
- %author% – the name of the author which created the post
How to enable the permalinks on your website
In order to choose a permalink as we mentioned in the beginning of this article you should access the admin area of your website → Settings → Permalinks. And once you decide which permalink you want to use just choose its radio button and lick on “Save changes” at the bottom of the page. If you are creating a custom structure you should choose the option and after that click on the tabs below to choose the slug:

When you choose a permalink WordPress created a rewrite rule which is placed into the .htaccess file of the website. If the application is not able to place the rule it will display it and you will have to add it manually.
It is recommended to configure the permalinks when the website is still builded because changing them later might cause issues in the SEO of your website.
Permalinks for post/pages
Once you have the permalinks set the website will by default use the chosen structure for every page or post. However, there is a way to change the permalink name for a page or post. If your website is set with the Postname permalink it will display the name of the article, and for example if you wish to change the name from “Hello, world”,, to “First page” you can do that by accessing the post/page which you want to customize and click on “Edit”. On the right column you will find the “Permalinks” menu on which you can edit the name:

Once you are ready, you can click on the “Update” Button.