With this vBulletin hosting package you will never be on your own. Our expert vBulletin technical support team will make sure that you have a bug-free and secure vBulletin installation in less than 10 minutes, complete free of charge. The vBulletin installation can be requested from the client’s area -> Get Support section -> Submit Support Ticket.
Create MySQL database and user for vBulletin forum
Prior to install vBulletin forum, you have to create a MySQL database and add a user with all privileges to it. You can do this by following the simple steps below or our video tutorial available at: https://www.tmdhosting.com/tutorials/video/cpanel.html -> Create MySQL DB
Log into your cPanel (located at https://yoursite.com:2082 for your domain) Go to MySql databases. Scroll down and find: Db: _________ [add]. Here your preferred database name should be entered. Then, click Add.
This will create a database in the format of cpanelusername_databasename, where cpanelusername is your cPanel account login username with TMDHosting. Databasename is the name you have typed for your database. Now scroll down to Users. Enter a username and password, and then click Add User.
This will create a username in the format of cpanelusername_username, where cpanelusername is your cPanel account login username with TMDhosting, and username is the one you have just created for your new database. Please, scroll back up to locate the two drop down boxes with a button that says [Add User to Db]. In the drop-down select box on the left, choose your newly created username, and in the box on the right, choose your newly created database. Click Add User to Db.
vBulletin download and installation
The above steps cover all the required actions you have to take regarding your database creation process. When you are ready you can download the installation package of vBulletin via your member`s area accessible at: https://members.vbulletin.com/ When you have your vBulletin installation package downloaded on your local computer, please extract the content on your local computer. In the newly created folder you will find a directory called ‘’Upload’’. In the upload folder you will find a directory called ‘’includes’’. Please open this folder and locate the file called config.php.new. This file should be renamed to config.php. When you have the file renamed, should open it with your favorite text editor and locate the following lines:
$config[‘Database’][‘dbname’] = ‘forum’;
$config[‘MasterServer’][‘username’] = ‘root’;
$config[‘MasterServer’][‘password’] = ”;
You should change your database name and username as well as input your database password on the lines above. If your database and username are called ‘’example_vb’’ you should change the lines to the following:
$config[‘Database’][‘dbname’] = ‘example_vb’;
$config[‘MasterServer’][‘username’] = ‘example_vb’;
$config[‘MasterServer’][‘password’] = ‘password’;
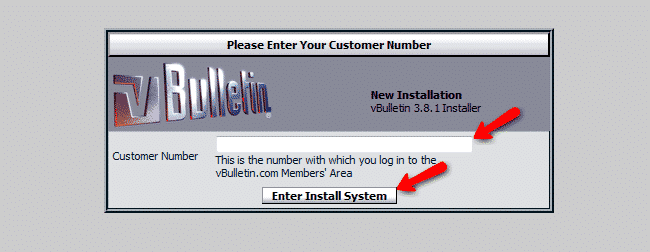
Then you should save the file in order to preserve the changes. Now you are ready to upload the installation files of your vBulletin forum. All the content of the Upload folder should be uploaded to your account under the directory where you would like to have vBulletin installed. You can upload the content from your local computer to your public_html (or the desired subdirectory) using your favorite FTP client by following the instructions in our tutorial here (https://www.tmdhosting.com/tutorials/video/ftp.html) As soon as the vBulletin files are uploaded you can access the installation wizard at https://yourdomain.com/install/install.php. On the first page you will be asked to provide your Customer Number which is your vBulletin member’s area username.

On the next step you can click on the Next Step button and proceed with the installation process.

The first step of the installation will verify the existences of the config file and if it is readable. If you have properly followed the all the steps above you should be displayed with the following message: ‘’ Config file exists and is readable.’’ This means that you can safely proceed with the installation by clicking on the Next Step button. On the second step vBulletin will check your database. If all the settings have been properly applied in your config file as advised above you should be displayed with the following message:

Please click on the Next Step button in order to proceed with the installation. The third step will populate the vBulletin database with all tables required. When the following message is displayed on the bottom of your page you can proceed by clicking on the Next Step button:

During the next step vBulletin will apply the session and language type after which you can proceed by clicking on the Next Step button.

During the next step the installation wizard will populate the vBulletin database with the default data. On the sixth and seventh step the master language file will be imported as well as the default vBulletin style. When the ‘’ Okay’’ message is displayed, please proceed with the installation. The eighth step of the installation will import the admin help manual which will be accessible via your admin panel after the installation.
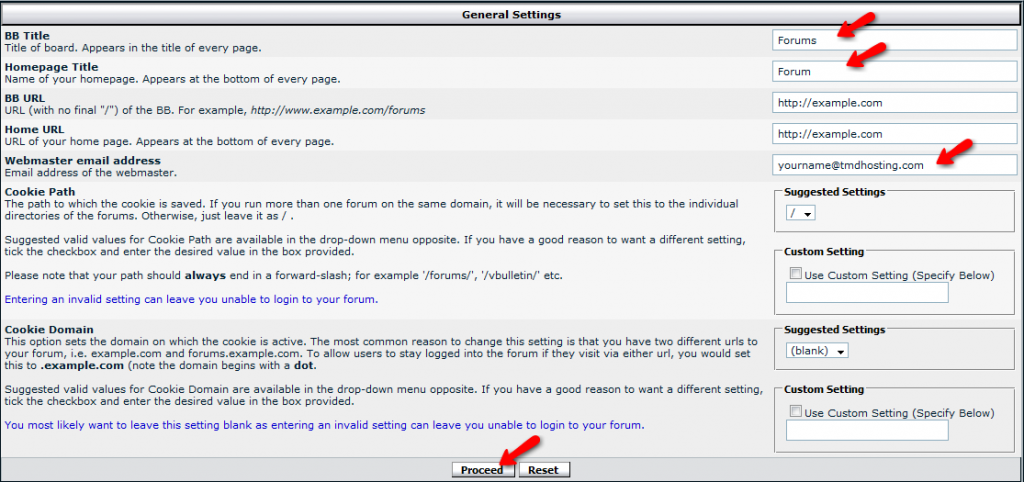
Next you will be asked for some default settings – please input your forum name as well as your email address.

On the next page you can proceed by clicking on the next step button. Next you will be asked to input the desired administrative username, password as well as the email address that will be set for the admin account.

The next step will create the administrative account for you after which you can click on the Next Step button. You will be displayed with a message informing that the installation has been successfully completed. Please note that you will need to remove install/install.php file from your account in order to activate the vBulletin forum. You can perform this via your cPanel -> file manager -> navigate to your vBulletin installation folder, select the install.php file and delete it. On the other hand, you can use your favorite FTP client to remove the file in question.

